
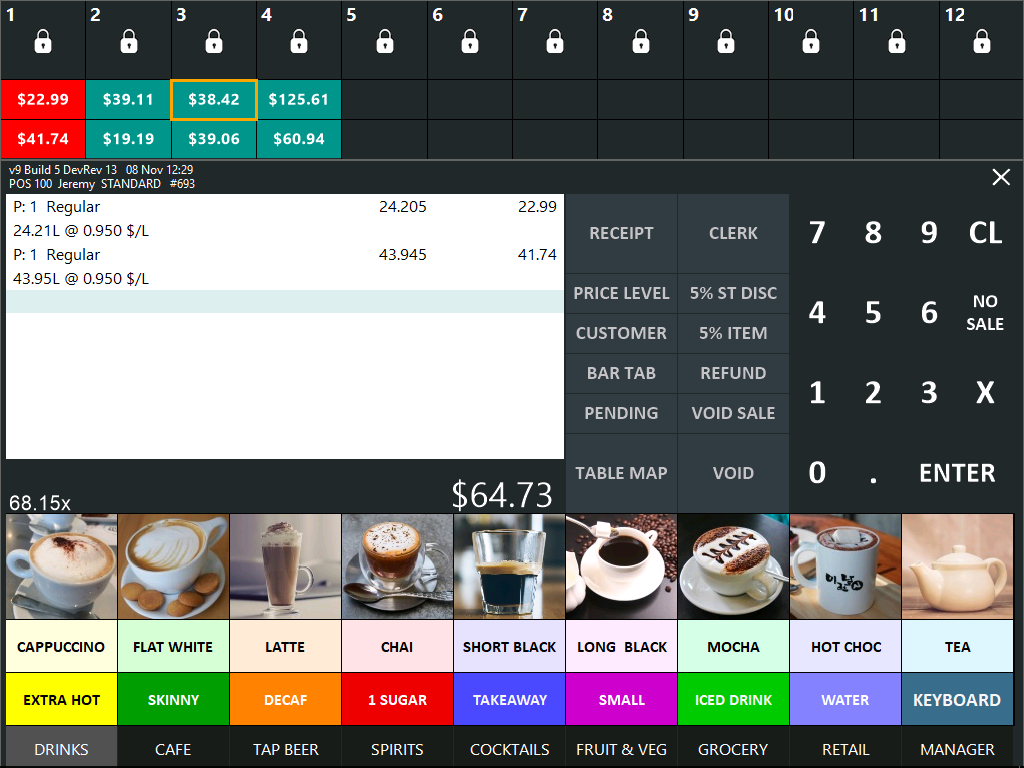
When the Enabler Embedded Interface has been configured and enabled, the top-portion of the POS Screen will contain the Idealpos Enabler Interface.
The Idealpos Enabler will contain a row of up to 16 Pump numbers (depending on the number that has been configured in Global Options > Interfaces > Fuel Console).
The following functions are supported by the Idealpos Enabler Interface:


The standard process for performing a Fuel Sale is as follows.
When a customer lifts a nozzle at a pump, the lock symbol of the pump number will change to a person with their hand raised holding a nozzle.
The symbol will flash between white and red to draw the attention of the clerk.
In v9 Build 10 and newer, Idealpos will also play a sound which can be customised - refer to Additional Customisation - Sound Files for more information.
Tip - Back Office Authorisation/Minimise
An Idealpos system that is only licensed for Back Office can also be used to authorise a fuel sale (though, payment for the sale must still be completed at a POS Terminal).
The process to authorise a fuel sale from the Back Office is the same as a standard POS Terminal, with the exception being that the Back Office cannot be used to pay for the sale.
To authorise a fuel sale from a Back Office, follow the same process outlined below (press the symbol of the person).
In addition to authorising fuel from a Back Office, a Back Office only licensed system can minimise the Fuel pump section (provided that it has the Enabler module enabled in the Licence).
To minimise the Fuel section, press the cog symbol on the top-right corner, then press the minimise button.
To authorise the fuel sale, press on the symbol of the person.

The symbol will change to a nozzle and the dollar amount in the first slot will start increasing, indicating that fuel is now being pumped.

After the customer finishes pumping fuel, the symbol will change back to a lock icon and the amount shown in the first slot will appear with a solid green background.
The Fuel Grade Code will also be displayed next to the amount.
Tip!
The Fuel Grade Code is configured in the ITL Enabler web interface (open a web browser and go to: http://[enterIPAddress] > Enter Username/Password.
If the IP Address of the ITL Enabler is 192.168.1.1, then enter http://192.168.1.1.
Once logged in, go to: Configuration > Grades > Press the "Edit" button next to a Grade, then ensure a Grade Code is entered in the Grade Code field (e.g. PR for Premium, RG for Regular, etc.).

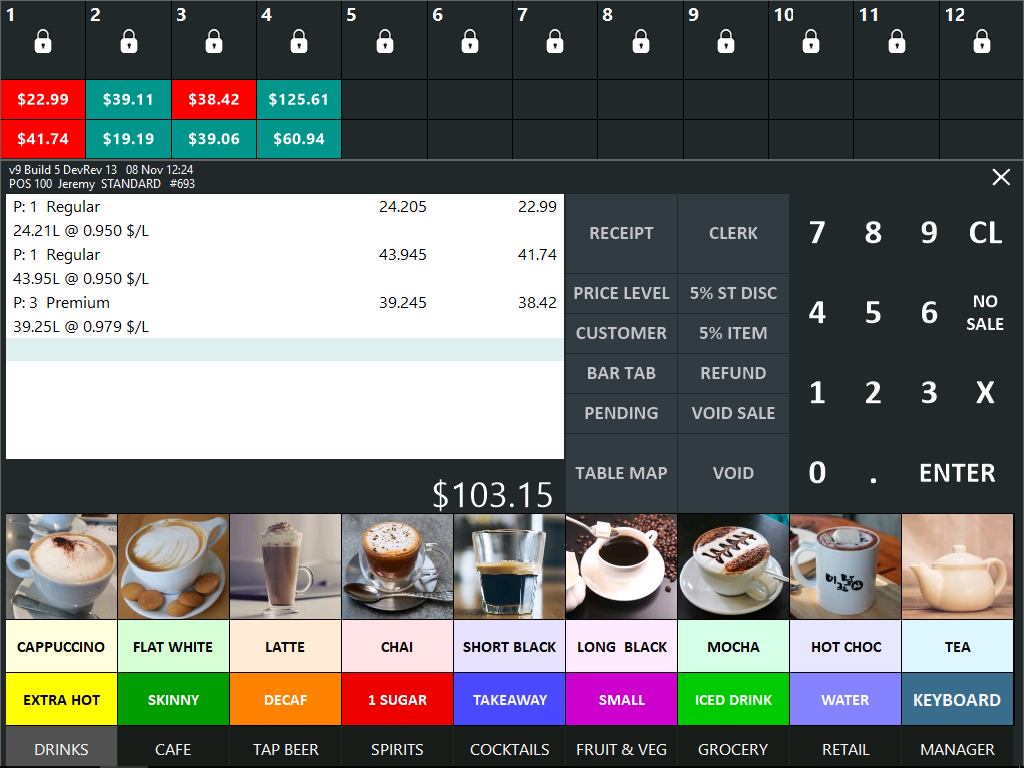
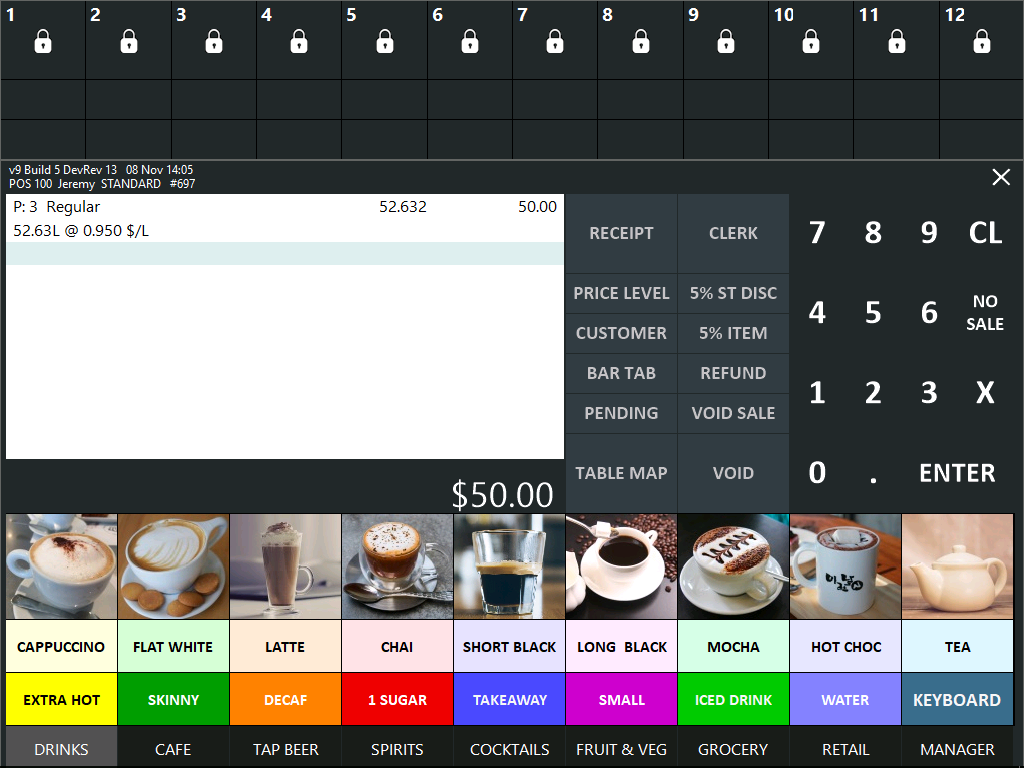
When the customer arrives to pay for their fuel, press on the amount in the slot below the pump number.
The fuel will be added to the sale and the slot below the pump number that shows the amount being paid will change to red.
The customer may also purchase any other items that they require.

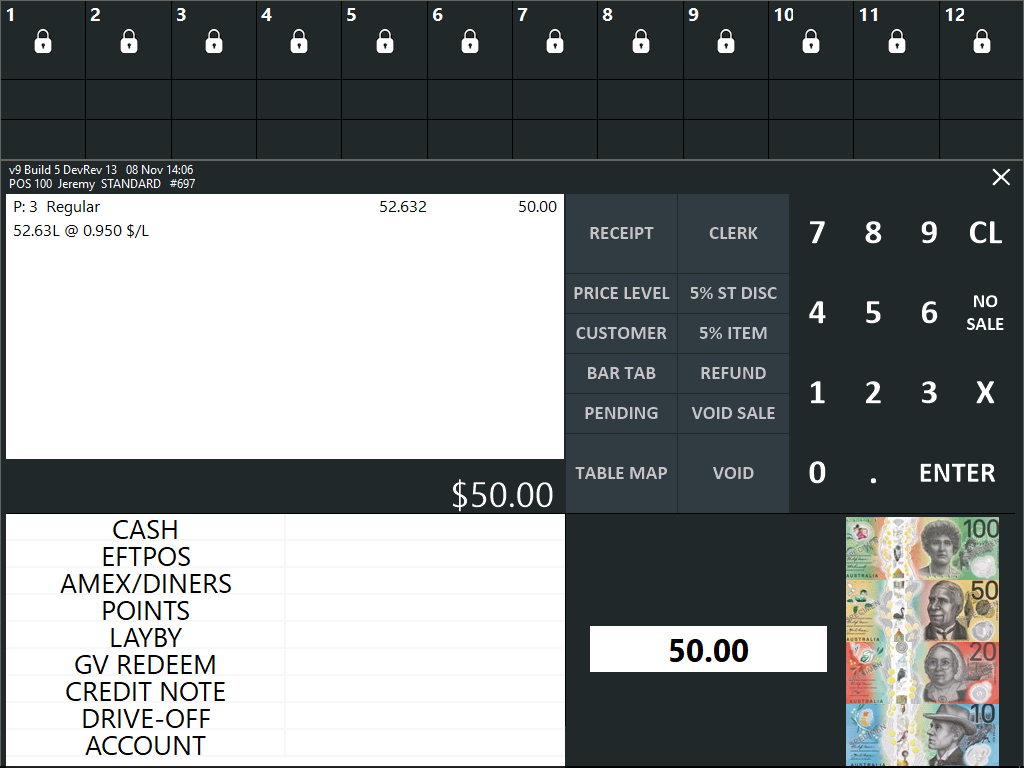
Press the ENTER button to continue to the Tender screen and take payment from the customer.

Note!
In a multiple POS Terminal environment, when a POS Terminal is currently paying off one or more pumps, those pumps that are currently being paid will appear as greyed out on other POS Terminals.
E.g. The following screenshot shows a $9.81 sale at Pump 1 - Slot 1 as being greyed out.
This is because this sale is currently being paid on another POS Terminal.
Once the other POS Terminal finishes paying off the sale, it will be cleared.
If the other POS Terminal voids the sale before paying it off, the sale will become available for being paid off at another terminal.

The Idealpos Enabler contains two slots for each pump which can store two unpaid fuel sales.
This functionality can be used when a customer has finished dispensing fuel from a pump but has not paid yet (i.e. moved their vehicle), and another customer arrives and wants to use the pump that contains an unpaid sale.
When this event arises, the second slot will be utilised and the process on using this functionality is outlined as follows.
Customer A arrives and lifts the nozzle at the pump.
The lock symbol of the pump number will change to a person with their hand raised holding a nozzle.
The Clerk presses on the symbol to authorise the pump.

Customer A starts filling their vehicle and the pump displays the nozzle icon while this takes place.

After Customer A finishes filling their vehicle and returns to the nozzle to the holder, the symbol changes to a lock icon and the amount in Slot 1 changes to green.

Customer A moves their vehicle and Customer B arrives at the same pump number.
Customer B lifts the nozzle.
The lock symbol of the pump will change to a person with their hand raised holding a nozzle.
The Clerk presses on the symbol to authorise the pump.

The fuel that was dispensed by Customer A will move from Slot 1 into Slot 2.
The fuel that is being dispensed by Customer B will appear in Slot 1.

After Customer B finishes pumping fuel into their vehicle, the symbol will change to a lock icon and the amount in Slot 1 changes to green.

Both Customers can now pay for their fuel based on the dollar amount that was dispensed.
The Clerk will have to click on the correct slot/amount that corresponds to the customer paying and the selected amount will be added to the sale.
Note that when both slots have been occupied, no further authorisations can be performed at the pump until there is at least one spare slot.
Should a customer lift the nozzle while both slots are occupied, the symbol will still change.

Attempting to authorise the pump while both slots are occupied will trigger the following prompt (Cannot Authorise until stacked transactions are finalised!).
This will prevent the pump from being authorised until there is at least one free slot available.

It is possible to pay for multiple pumps or slots at the same time.
Simply press on the required slots below the pump numbers and the fuel from the selected slots will be added to the sale.
Any slot that has been added to the sale will be indicated as such with a solid red background.
The fuel can then be paid by pressing the ENTER button and tendering with the desired tender method.
It is also possible to void fuel from the sale and when doing this, the slot will change from red back to green.
To void fuel, select the line in the sale that contains the fuel item, then press the VOID button.
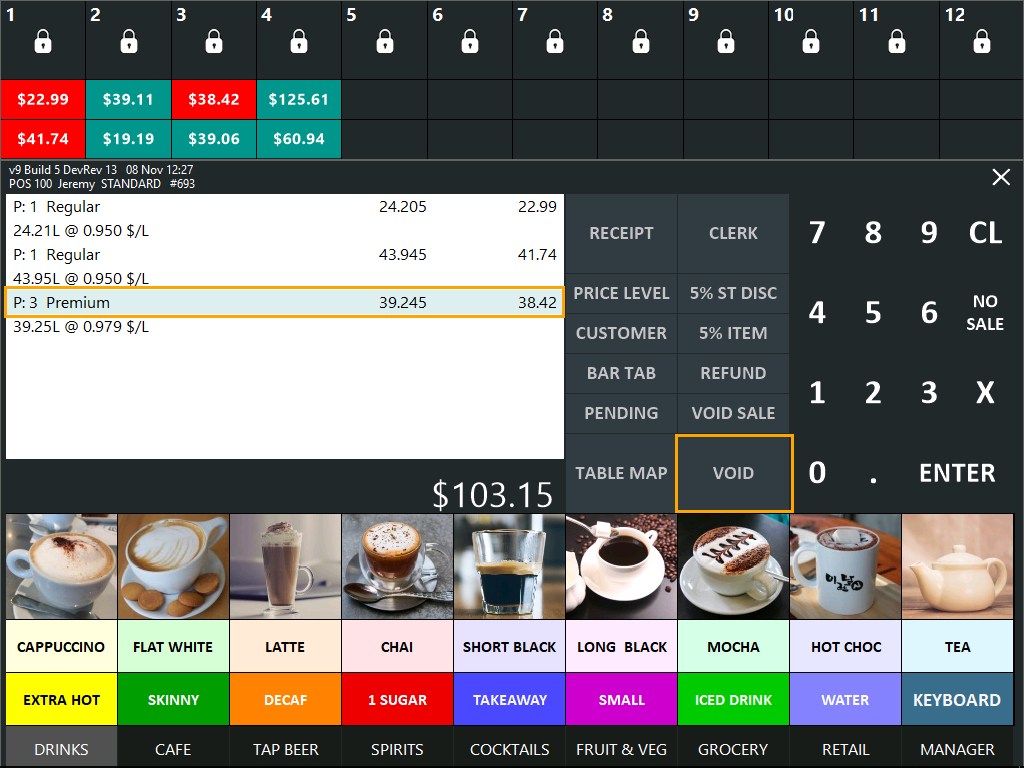
The fuel will return to its original slot.
If required, the Void Sale function can also be used and this will void all fuel items from the sale and return the amounts back to the relevant slots.
In the event that a customer drives off without paying for fuel, the sale will need to be tendered off using the DRIVE-OFF Tender.
Select the slot below the pump number.
The fuel is added to the sale.
Press the ENTER button to proceed to the tender screen.
Select the DRIVE-OFF Tender from the list of Tenders.
Depending on how the DRIVE-OFF Tender has been configured, any information related to the Drive-Off can be recorded.
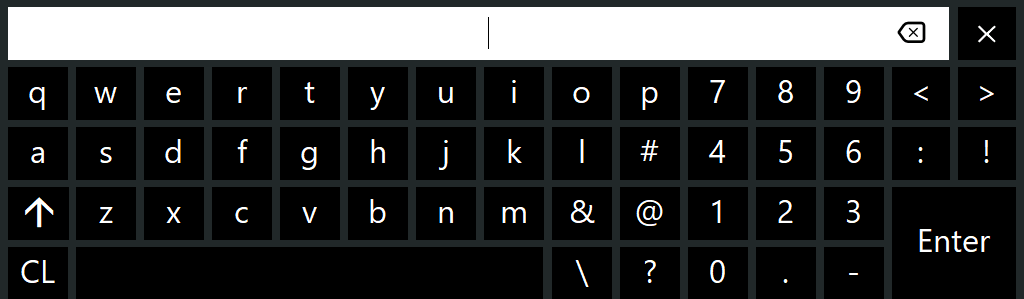
If Force Reference is enabled, enter information into the reference field related to the Drive-Off.
The information entered in the Reference screen/keyboard will appear within the receipt that is printed.
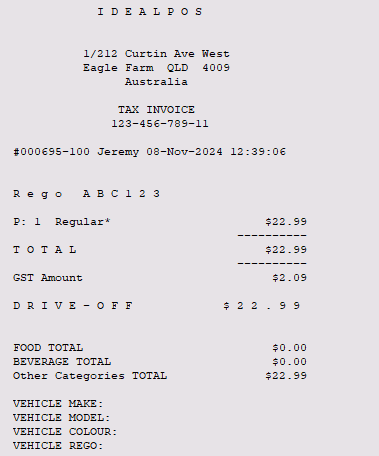
If the Drive-Off Receipt Footer has been configured with spaces for writing the relevant information (e.g. Vehicle Make, Model, Year, Colour, Registration Plate, etc.), this an be recorded on the receipt so that it can be supplied to the relevant authorities.
The below example receipt shows a Reference of Rego ABC123 being entered, along with the additional Override Receipt Footer with places for entering Vehicle details.
If using Idealpos v9 Build 11 to Build 13, a "Fuel Prices" function is available which can be used to change Live Fuel Prices. Pressing the Fuel Prices function will open the Grade Prices window to enable changing Live Fuel Prices (refer to Grade Prices below for more info).
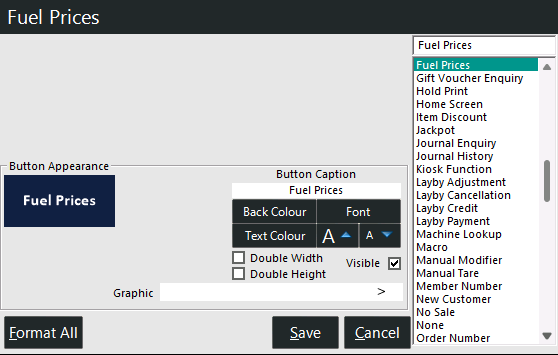
If using Idealpos v9 Build 14 and newer, the "Fuel Prices" function has been renamed to "Fuel Functions".
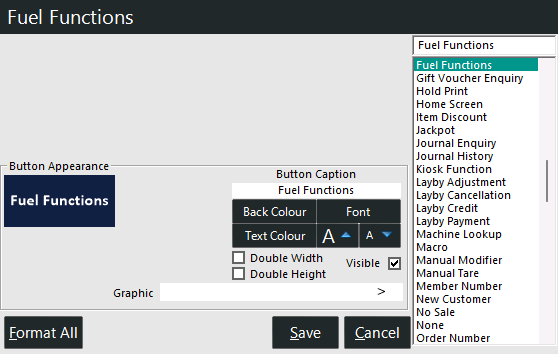
Fuel Functions includes the following functionality:
When accessing Fuel Functions, a main screen will be displayed containing the following information:

When receiving a Fuel Delivery into the Fuel Tanks, select the Tank/Grade > press the Fuel Delivery button.
This will display a prompt to enter the Delivery Volume and the Delivery Reference for the selected Tank.
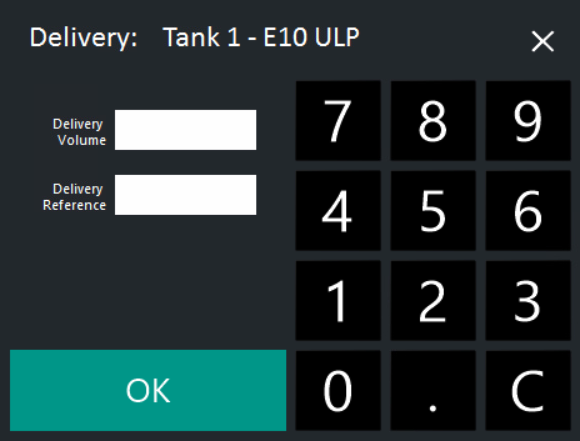
After pressing OK, a prompt will be displayed to confirm the Delivery of Fuel to the selected Tank.

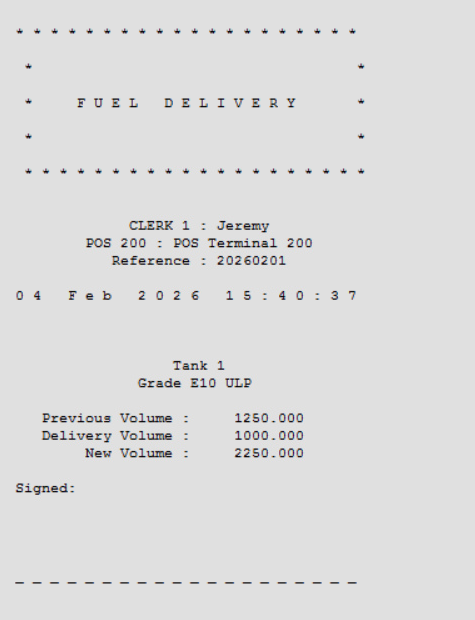
Pressing Yes will increment the Fuel Level for the tank by the entered amount.
A docket will be printed containing the Fuel Delivery details.
Note that the docket will be forced (if Receipt is turned off, the docket will still print to the Receipt Printer).
This will enable a new Tank Level to be set for the currently selected Tank.
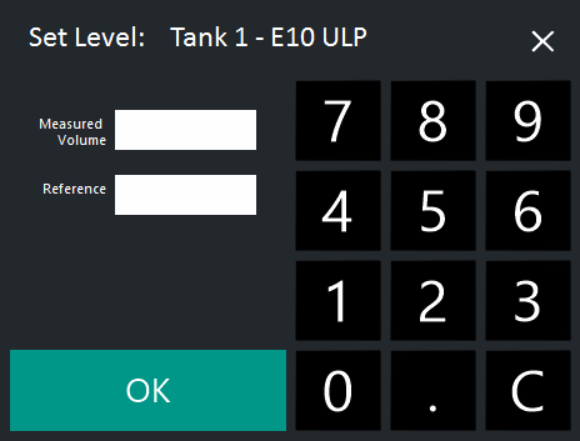
Select a Tank and press the Set Tank Level button.
This will display a prompt to enter the Measured Volume and Reference.
The Measured Volume entered will replace the previous Measured Volume for the Tank.
After pressing OK, a prompt will be displayed to confirm the Set Level for the selected Tank.

Pressing Yes will set the Fuel Level to the entered value.
A docket will be printed containing the Set Level details (previous Fuel Level, Set Fuel Level and the variance).

When the button is pressed, a Grade Prices window will be displayed and can be used to set new Fuel Prices for each Fuel Grade.
The Fuel Prices that are set via this function will trigger the Sell Prices to be sent to the ITL Enabler as well as being updated for the corresponding Idealpos Stock Items.
To prevent unauthorised access to this function, it is strongly recommended that the button is only placed within a restricted POS Screen Tab (e.g. Admin or Manager tabs).
The configuration of this function is outlined under the heading Additional Functionality - Change Live Fuel Prices within the Configuring Enabler Embedded with Idealpos page.
Note!
Modifying the Sell Prices via the Idealpos Stock Items screen (File > Stock Control > Stock Items) will not trigger the changes to be sent to the ITL Enabler.
The updated Fuel Prices will only be sent to the ITL Enabler when updated via the Fuel Prices button on the POS Screen.
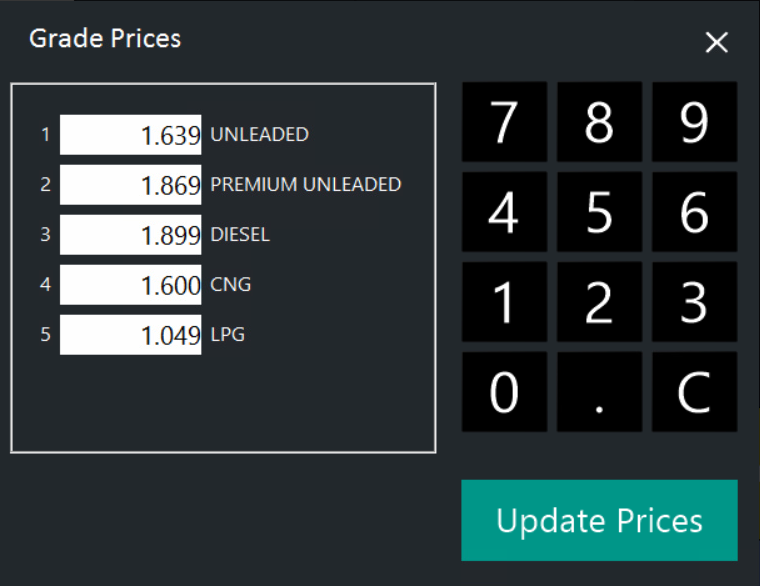
After pressing the "Update Prices" button, a Fuel Price Change docket is produced.
The docket contains a list of all the Fuel Grades which had their Prices changed, along with the Old Prices and New Prices.

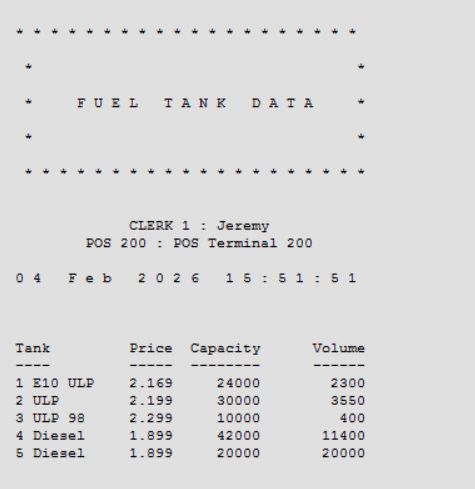
The Print Tank Data button will produce a docket printout that contains the current Fuel Tank Data information.
The Refresh Tank Data button will refresh the data that is currently displayed in the Fuel Functions window.
The Refresh Tank Data button can be used to ensure that the details that are displayed are current.

Click on one of the functions below for further details.
When a pump is blocked, it will not prompt for authorisation when a customer lifts the nozzle, preventing it from being used.
This function can be utilised if a pump is out of order.
The Block function can be accessed by pressing on the column of the desired pump number that needs to be blocked.

Click on the "Block" option to block the pump.

After the pump has been blocked, the colour of the lock icon will change to red, indicating that the pump is blocked.
While a pump is blocked, authorisation prompts will not be displayed when the nozzle is lifted.

A pump can be unblocked by pressing on the red lock icon and choosing the "Unblock" option.

Authorise can be used to authorise a pump to dispense fuel ahead of time before the nozzle has been lifted.
This may be useful in scenarios where a fuel station only has a single staff member working and they need to use a fuel pump to dispense fuel.
It can also be used in scenarios where a clerk can't be at the POS Terminal to authorise a nozzle at the same time that the customer lifts the nozzle.
Note - A pump does not have to be authorised using this method for every instance that a pump needs to be used.
It is recommended that the standard method be used (when the nozzle is lifted, the lock symbol changes to a person - press the symbol to authorise the pump).
Tip!
In V9 Build 10 and newer, an Idealpos system that is only licensed with Back Office can also authorise a fuel sale.
At the Back Office PC, select the fuel nozzle icon on the Windows taskbar which will display the window at the top of the screen containing all the pumps.
Select the pump, then press Authorise.
Note that the Back Office only supports the authorisation of a fuel sale; the sale must still be paid using a standard POS Terminal.
The Authorise function can be accessed by pressing on the column of the desired pump that needs to be authorised.
Click on the "Authorise" option to authorise the pump.
After the pump has been authorised, the lock icon will change to a check mark, indicating that the pump is now authorised for use.
The authorisation will only apply for a single use of the pump.

After the nozzle is returned to the holder, the authorisation will be cleared.
Any further use of the pump will require it to be authorised again.
Should the authorisation need to be cancelled, press the column of the pump and select the "Cancel Authorise" option.

After cancelling the authorisation, the check mark option will change back to the lock icon, indicating that the pump is locked.
The Prepay option can be used to prepay the pump to a specific dollar value.
This option is useful during late business hours to prevent drive-offs.
The Prepay function can be accessed by pressing on the column of the desired pump that needs to be prepaid.
Click on the "Prepay" option.
Select the Hose that is being prepaid.

Enter the amount.

As the amount is being entered, a "Prepay" button will appear showing the amount that is being entered.
After the final amount is entered, press the "Pay" button.

The fuel Stock Item will be added to the sale and a PREPAID Reference will be recorded.
Any other items that the customer wishes to purchase can also be added to the sale.
Press the ENTER button to progress to the Tender screen and take payment from the customer.
The Pump slot will show the prepaid amount and the lock icon will change to a check mark, indicating that the pump is now authorised.

The customer can now proceed to pump fuel up to the prepaid amount.
After the customer has finished pumping fuel, the icon will change to a lock indicating that the pump is now locked.

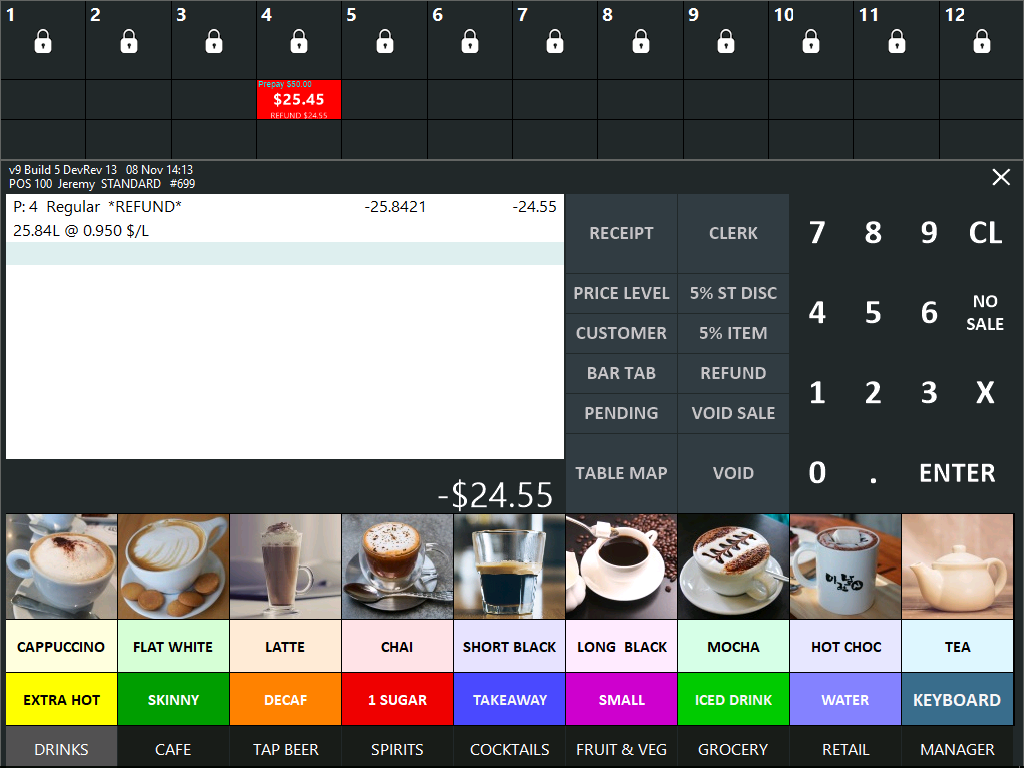
If the customer does not pump fuel to the paid amount (e.g. fuel tank reaches full before the full amount is dispensed or if the customer stops pumping fuel), the customer will need to be refunded the difference.
When this occurs, the Enabler will show the following details:

Press the slot below the pump to proceed with the refund.
The remaining amount that wasn't dispensed will be added to the sale as a refund.
Press the ENTER button to continue to the Tender screen.
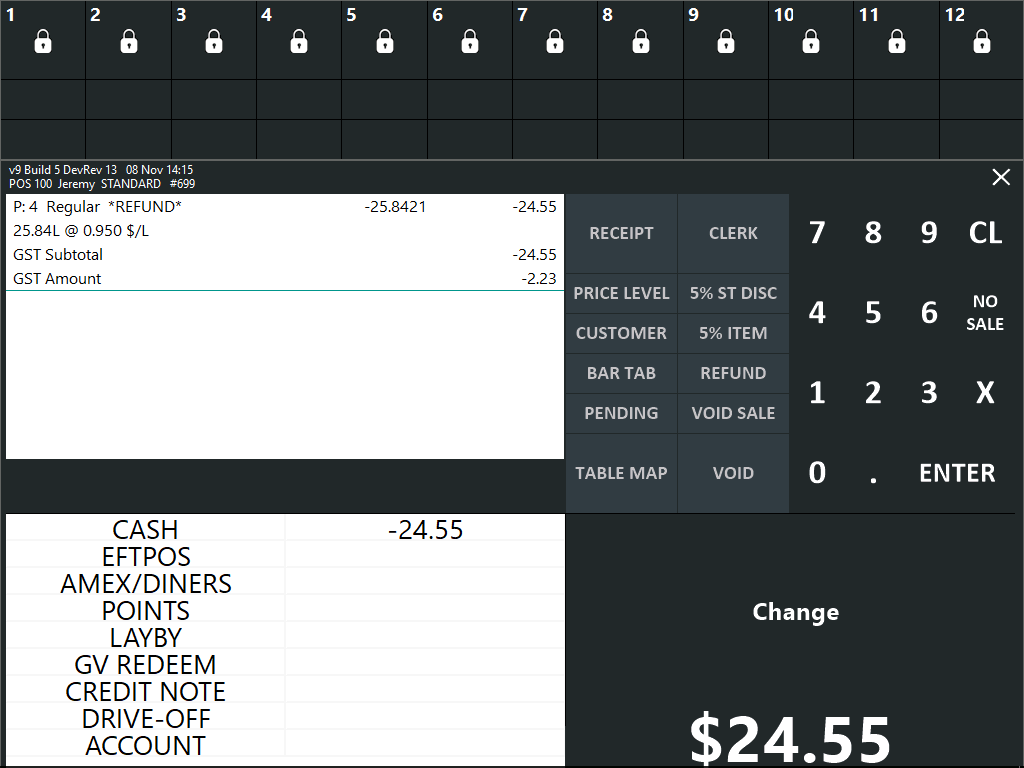
Press the required tender to refund the amount to the customer.
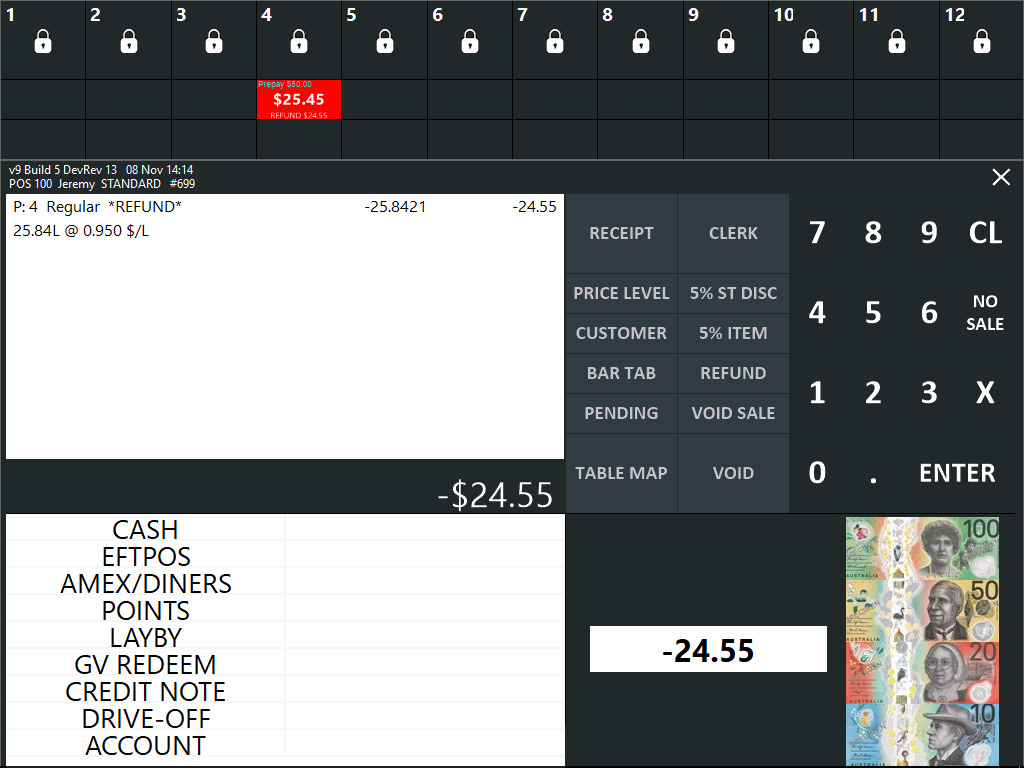
The amount will be refunded to the customer using the selected tender.
The Pause Delivery and Resume Delivery function is available by pressing on a pump number while a customer is pumping fuel.
Pressing the "Pause Delivery" option will pause the pump and temporarily stop fuel from pumping.
Fuel will resume pumping when the clerk presses the pump number and selects the "Resume Delivery" option.
This functionality can be used when a customer commits an offence while pumping fuel (e.g. if they use a mobile phone or smoke while pumping fuel), the clerk can Pause the pump and make an announcement using the forecourt PA system advising the customer to cease offending.
When the customer stops using their mobile phone or stops smoking, the clerk can press the "Resume Delivery" option which will enable the customer to resume pumping fuel.
To use this function, press a pump number while the pump is dispensing fuel.
The Pause Delivery option will be displayed - press "Pause Delivery" to pause the pump.
After pressing Pause Delivery, the pump colour will change to red to indicate that it is currently paused.

To resume the pump, press the pump number and select the "Resume Delivery" option.
The pump will resume and the dollar value will increment until the customer stops filling.

This functionality enables the ability to Pause All pumps/Unblock all pumps.
This can be used in situations such as emergencies where all pumps need to be quickly paused.
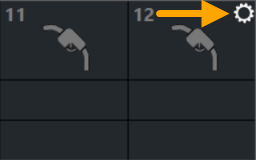
To access this function, press the cog icon on the top-right corner of the Enabler section that shows all the fuel pumps:

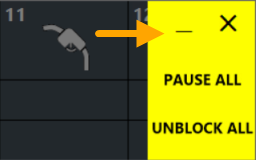
The following options are displayed:

After pressing the "Pause All" option, the following prompt will be displayed to confirm the action.
Press "Yes" to Pause All Pumps.

After all pumps have been paused, all active pumps that were in use will appear as red nozzle symbols and the amounts will stop incrementing.

Any pumps that were not in use when the Pause All action was taken will appear as red lock symbols.

The Unblock All option can be used to unblock all pumps, enabling fuel delivery to resume.

Slot 1 is the first slot that appears below a pump number.
This is the first slot that is populated with a fuel sale when fuel is being dispensed from a pump.
This is the slot that is used the most when standard fuel sales are done.
Refer to Performing a Fuel Sale for further information on how this function is used with fuel sales.

Slot 2 is the second slot that appears below the first slot.
When Slot 1 is already occupied with a fuel sale and the pump is authorised for another fuel sale, the sale from slot 1 is moved into slot 2 and assigned with a letter A. The new sale will be stored in slot 1 and assigned with a letter B.
When both Slot 1 and Slot 2 are occupied, no further authorisations at the pump will be allowed until there's at least one empty slot.
For more information about utilising both slots 1 and 2, refer to Utilising Multiple Slots to Authorise Fuel at a pump that already contains an unpaid sale.
